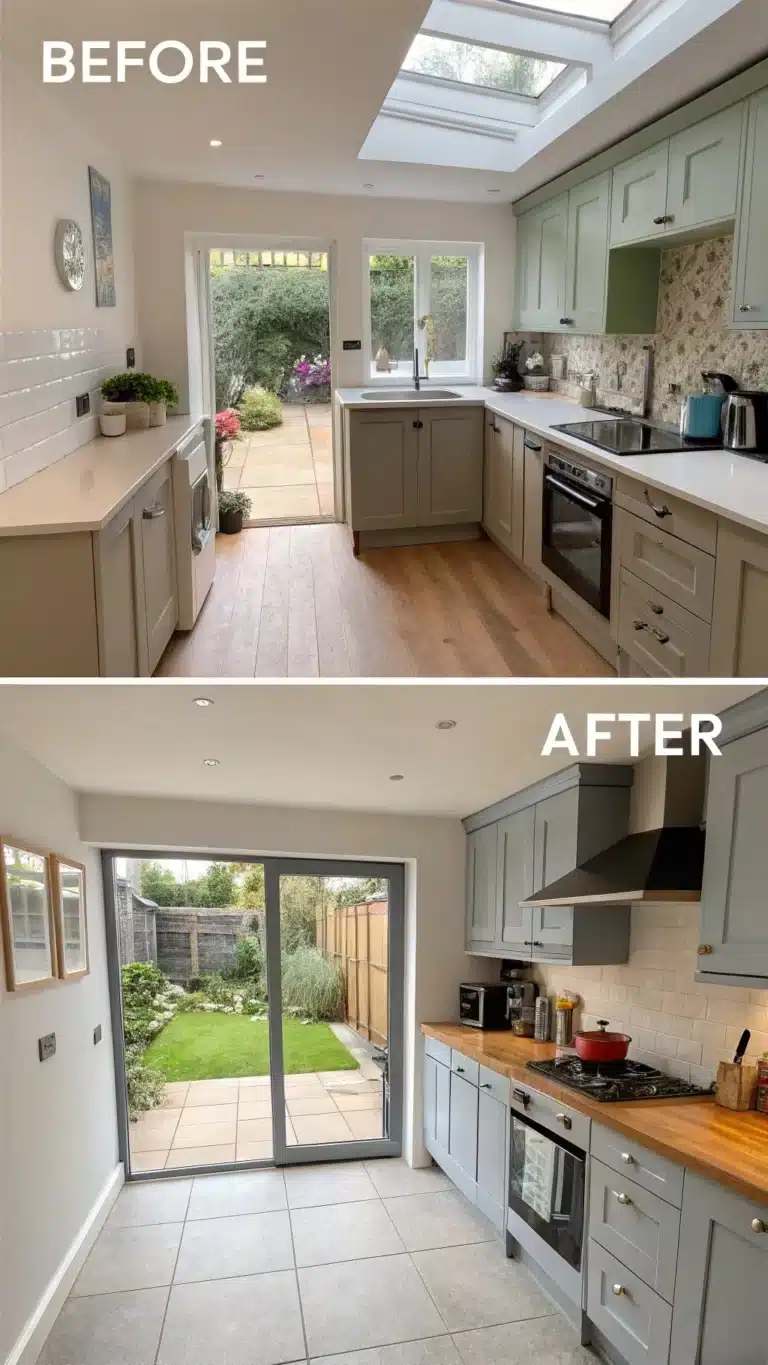
Small kitchens often feel cramped and dull. Walls get dirty quickly. Without much space, design choices matter a lot. A backsplash offers a simple way to protect walls and add style. It changes your kitchen’s look without taking space. This article shows 10 small kitchen backsplash ideas. All ideas suit tight spaces and fit many budgets. You will find tips on choosing materials, DIY approaches, and the newest trends for 2025. Ready to transform your small kitchen?
Why Your Small Kitchen Needs a Backsplash (Beyond Just Looks)
Backsplashes do more than look nice. They serve important functions in small kitchens.
Functionality:
- Protect walls from spills, grease, and water.
- Make cleaning easier with smooth surfaces.
- Increase wall durability for longer use.
Design Impact in Small Spaces:
- Add style without using floor or counter space.
- Create a strong focal point that catches the eye.
- Use color and texture to brighten or enlarge the look.
- Reflect light with glossy tiles or glass to open space.
“A well-designed backsplash turns a small kitchen from plain to powerful,” says Jane Doe, interior designer. Small kitchens need every design trick to feel bigger and brighter.
The Top 10 Small Kitchen Backsplash Ideas (Detailed Breakdown)
Below are ten backsplash ideas that fit small kitchens beautifully. Each one explains why it works, pros and cons, and budget and DIY notes.
1. Classic Subway Tile: Timeless Appeal for Small Kitchens
Description: White or light subway tiles with clean, simple lines. Popular in modern and traditional kitchens.
Why It Works: Its simplicity and glossy finish reflect light. Vertical installation adds height illusion.
Pros:
– Easy to clean and maintain.
– Affordable and widely available.
– Matches many kitchen styles.
Cons:
– May feel plain if used alone.
– Grout lines require periodic cleaning.
Design Tips: Use colored grout for contrast or install in a herringbone pattern for interest. Pair with white cabinets for a fresh look.
Budget & DIY Notes: Moderate cost. Good for DIY beginner projects. Watch grout application closely.
Alt text: white subway tile backsplash in small kitchen
2. Stylish Hexagon or Penny Tile
Description: Small, round or hexagonal tiles creating a honeycomb pattern.
Why It Works: Small shapes add texture without overwhelming space. Patterns give a fun twist.
Pros:
– Adds visual interest with texture.
– Works well with neutral or bold colors.
Cons:
– Can be tricky to install.
– More grout lines mean more upkeep.
Design Tips: Use light colors to keep the kitchen bright. Consider contrasting grout for a modern look.
Budget & DIY Notes: Slightly more expensive than subway tile. Best for intermediate DIYers.
Keyword: tile backsplash small kitchen
3. Elegant Herringbone or Chevron Pattern
Description: Tiles arranged in a zigzag pattern, often with rectangular subway tiles or wood-look tiles.
Why It Works: Directional patterns draw eyes upwards and sideways, creating spacious feel.
Pros:
– Adds movement without clutter.
– Looks high-end and modern.
Cons:
– Installation is complex.
– Pattern may feel busy in very small spaces.
Design Tips: Choose soft colors for subtle effect. Pair with simple countertops.
Budget & DIY Notes: Higher cost due to labor. Best for hire or experienced DIY.
4. Bold Patterned or Moroccan Tile
Description: Colorful tiles with geometric, floral, or abstract patterns reminiscent of Moroccan style.
Why It Works: Acts as a beautiful focal point, adding personality to small kitchens.
Pros:
– Unique and eye-catching.
– Covers imperfections well.
Cons:
– Can overwhelm if overused.
– Pattern limits future style changes.
Design Tips: Use only behind the stove or sink for balance. Pair with neutral walls.
Budget & DIY Notes: Moderate to high cost. DIY possible with patience.
5. Convenient Peel and Stick Tiles
Description: Self-adhesive tiles in various materials (vinyl, faux stone, metal).
Why It Works: Easy, affordable option that works for renters and quick updates.
Pros:
– Fast installation without tools.
– Budget-friendly.
– Easy removal and replacement.
Cons:
– Less durable.
– Not heat resistant near stove.
Design Tips: Clean wall thoroughly before applying. Choose light colors or reflective finishes.
Budget & DIY Notes: Cheapest option, perfect DIY for beginners.
Alt text: peel and stick tile backsplash DIY project
6. Sleek Glass or Mirrored Backsplash
Description: Smooth glass panels or mirrored surfaces.
Why It Works: Reflects light to enlarge visual space. Easy to clean.
Pros:
– Brightens and opens space.
– Water and stain resistant.
Cons:
– Shows fingerprints easily.
– Can be costly.
Design Tips: Use subtle tinted glass for warmth. Consider lighting behind glass for elegance.
Budget & DIY Notes: Higher price. Installation often needs a professional.
7. Rustic Brick (Real or Veneer)
Description: Textured brick walls or thin brick veneers painted or natural.
Why It Works: Adds warmth and texture to a small kitchen.
Pros:
– Unique and earthy feel.
– Durable and long lasting.
Cons:
– Can look heavy if overdone.
– Difficult to clean brick pores.
Design Tips: Paint bricks white or light colors to keep space bright.
Budget & DIY Notes: Moderate cost. Veneers easier for DIY.
8. Natural Stone (Marble Slab or Tile)
Description: Marble, granite or quartz slabs or tiles.
Why It Works: Adds luxury and timeless beauty.
Pros:
– Durable and heat resistant.
– Unique natural patterns.
Cons:
– Expensive.
– Requires sealing and upkeep.
Design Tips: Use light-colored marble to brighten. Match with simple designs to avoid clutter.
Budget & DIY Notes: High cost. Professional installation recommended.
9. Affordable Beadboard or Wood Panels
Description: Vertical wooden panels or beadboard painted and sealed.
Why It Works: Adds charm and warmth with texture.
Pros:
– Inexpensive and light-weight.
– DIY-friendly.
Cons:
– Not water or heat resistant unless treated.
– May require regular maintenance.
Design Tips: Use behind dry areas or with protective coating.
Budget & DIY Notes: Very budget-friendly DIY option.
Alt text: budget-friendly beadboard backsplash idea
10. Modern Metal (Stainless Steel or Copper)
Description: Smooth metal sheets or tiles adding a sleek, industrial look.
Why It Works: Durable, easy to clean, and reflects light well.
Pros:
– Heat and water resistant.
– Adds modern style.
Cons:
– Scratches and fingerprints visible.
– Can be cold or clinical looking.
Design Tips: Mix with warm wood tones. Use as an accent, not full wall.
Budget & DIY Notes: Mid to high cost, tough DIY unless using peel-and-stick metal tiles.
Alt text: modern glass backsplash reflecting light in compact kitchen
How to Choose the Perfect Backsplash for Your Small Kitchen
Selecting the right backsplash takes thought about style, material, and function.
Key Considerations:
- Your Style: Match or contrast with cabinets and countertops.
- Material: Choose water and heat resistant options for near sink/stove.
- Color & Pattern: Light colors open space; bold adds personality.
- Budget: Set limits and balance cost versus style.
- Installation: DIY or hire? Know your skill level.
- Scale: Small tiles suit small spaces better. Large patterns may overwhelm.
Material Comparison Chart
| Material | Durability | Maintenance | Cost Range | DIY Friendly |
|---|---|---|---|---|
| Subway Tile | High | Moderate | Low-Mid | Yes |
| Peel & Stick | Low | Low | Low | Yes |
| Glass | High | High | Mid-High | No |
| Brick Veneer | High | Moderate | Mid | Yes |
| Wood Panels | Low | High | Low | Yes |
| Metal | High | Moderate | Mid-High | No |
| Natural Stone | High | High | High | No |
Steps to Pick Your Backsplash:
- Measure your backsplash space accurately.
- Set your budget first.
- Choose materials fitting your kitchen’s moisture and heat levels.
- Select colors and patterns matching your style.
- Decide on professional install or DIY.
- Order samples and view them in your kitchen lighting.
Budgeting for Your Small Kitchen Backsplash: Costs & Savings
Backsplash costs vary widely. Materials, tools, and labor affect price.
Cost Factors:
- Materials range from $5 to $50 per square foot.
- Adhesive, grout, sealers add $1–$5 per sq.ft.
- Professionals charge $40–$70 per hour.
- Demolition may add costs if replacing old backsplash.
Budget-Friendly Options:
- Peel and stick tiles cost $5–$15/sq.ft.
- Beadboard and wood panels cost $10–$20/sq.ft.
- Subway tiles often cost $10–$25/sq.ft.
Saving Tips:
- Measure precisely for less waste.
- Buy during sales or clearance.
- Limit backsplash to key areas like behind stove.
- Take on DIY for labor savings.
“A backsplash update does not need to break the bank,” notes remodeling expert John Smith.
DIY Small Kitchen Backsplash Installation: Can You Do It?
DIY lets you save money and customize your kitchen.
Assess Skill Level:
- Simple peel and stick: great for beginners.
- Tile work needs more skill and tools.
Basic Installation Steps:
- Clean and prep walls.
- Measure and plan tile layout.
- Cut tiles or panels.
- Apply adhesive evenly.
- Press tiles firmly onto wall.
- Grout (if tile) and seal edges.
Tools Needed:
- Measuring tape
- Notched trowel
- Tile cutter or utility knife
- Sponge and bucket
- Grout float
Tips for Small Spaces:
- Work in small sections.
- Use corner trim for clean edges.
- Keep work area organized to avoid clutter.
Small Kitchen Backsplash Trends for 2025
New trends bring fresh ideas for small kitchens.
- Sustainable materials like recycled glass gain popularity for eco-conscious homes.
- Textured and 3D tiles add depth without large patterns.
- Bold colors used sparingly create impact.
- Mixing materials (tile + metal) adds interest.
- Easy-clean, high-performance surfaces save effort.
Using these trends carefully avoids overcrowding. A single accent wall or subtle texture works best.
Alt text: colorful zellige tile backsplash trend 2025
People Also Ask (FAQs about Small Kitchen Backsplashes)
What is the best backsplash material for a small kitchen?
Light-colored tiles like subway or glass reflect light and resist moisture. Peel and stick suits renters. Durable, easy to clean materials work best.
How high should a backsplash go in a small kitchen?
Standard height is 4 inches above countertops up to cabinets. Full height to range hood adds style and splash protection.
Can I put a backsplash behind my sink or stove?
Yes, these areas benefit most from protective backsplash materials.
Are peel and stick backsplashes good for small kitchens?
Yes, easy to install and budget-friendly. Not as durable but perfect for renters or short-term solutions.
How much does it cost to add a backsplash to a small kitchen?
Costs range $10–$50 per square foot depending on material and installation choice.
Small kitchens pose design challenges, but backsplashes offer a practical and creative fix. Each idea here suits tight spaces and diverse budgets. You can brighten your kitchen, protect your walls, and express your style with these smart choices.
Start measuring your wall and pick the option that fits your style and budget. Simple DIY projects can update your kitchen quickly. Remember, a small space does not limit your kitchen’s appeal. It can have beauty, personality, and function all in one.
“A kitchen you love builds memories no matter the size,” I always say. Enjoy your backsplash project!